
Author

Jo

Browsing

For years, my four-legged best friend never let me miss a single sunrise.
Rain, frost, or half-open eyes — we were out there, padding through the quiet while the world slowly woke up.

These days, without that wet-nosed alarm clock, I’ll admit it takes a little more persuasion to leave my cosy bed. But every time I do, I’m reminded why it’s worth it.

The morning light has a kind of quiet magic — it steadies your mood, lifts your energy, and helps you feel more balanced all day long.

Over the next 28 days, we’ll explore how a few minutes of early sunlight can:
🌿 Reset your circadian rhythm
🌿 Balance serotonin and melatonin
🌿 Boost calm, focus, and natural energy

It’s completely free, takes just 5–20 minutes a day, and fits easily into your morning — whether that’s a gentle stretch by the window, a walk around the garden, or a proper sunrise stroll (bonus points if you bring your own four-legged motivator).

This challenge is part of the Align & Uplift pathway here on Make Self-Care Simple, designed to help you build your personal toolkit of mood-boosting, energy-balancing practices.


Could sunlight boost your mood?

If you’d love to feel calmer, happier, more focused, experience emotional stability, and wake up refreshed — this challenge is for you.

The best part?
It’s completely free, takes only 5–20 minutes a day, and can easily fit into your morning routine.

This challenge is part of the Align & Uplift pathway here on Make Self-Care Simple, designed to help you build your personal toolkit of practices that support emotional and intuitive wellbeing.

Prefer a short version?

Jump to Recipe

Do you need the 28-day Sun-rise Challenge?

Your body is designed to function in response to morning sunlight.

You don’t have to do this every single day, but your energy, sleep, and mood all improve when morning sunlight becomes a regular practice.

  • Best timing: Within 1 hour of waking and within 2–3 hours of sunrise.
  • Duration: 5–15 minutes (without sunglasses).

In the UK, sunrise varies widely — from around 4:45 am in midsummer to 8 am in midwinter — so you’ll likely adjust your timing through the seasons.
On cloudy or grey days (hello, UK!), aim for 15–30 minutes instead.

Reflect:

  • How often do you get your morning sunlight?
  • Where might you make small adjustments?

For 25 years I walked my dogs every morning before work and knew that 80% of the year I was easily getting my morning sunlight. Now I no longer enjoy early morning dog walks this important self-care will be added to my personal menu.

Think this challenge sounds fun? Wait until you try it with my FREE Self-Care Challenge Toolkitit makes getting results so much easier.

Benefits of the 28-day Sunrise Challenge

Most people know that sunlight boosts vitamin D, which supports your immune system, vitality, and bone health.

But morning sunlight does something even more powerful — it helps regulate your hormones and circadian rhythm, directly improving your mood, focus, and sleep.

Key Benefits

  • Increases cortisol in the morning (natural energy boost)
  • Suppresses melatonin (helps you wake up)
  • Produces serotonin (the “feel-good” hormone)

Morning sunlight and your Circadian Rhythm

28-day Sunrise challenge-makeselfcaresimple

Your circadian rhythm is your internal sleep–wake clock. Morning sunlight signals your brain that it’s time to be awake — triggering a cascade of hormone activity that sets your mood and energy for the day.

By aligning with this rhythm through the Sunrise Challenge, you’ll feel:

  • More alert in the morning
  • Calmer and more focused during the day
  • Naturally ready to rest at night

Benefits of Balanced Cortisol

Cortisol isn’t just a “stress hormone.” When balanced, it helps you:

  • Increase energy and reduce fatigue
  • Handle stress with more emotional stability

Cortisol also supports:
blood sugar balance, inflammation control, blood pressure, metabolism, immune response, and your sleep–wake cycle.
Morning sunlight naturally triggers your body’s cortisol spike — giving you energy early and helping you sleep better later.

Benefits of suppressed Melatonin

Melatonin is a hormone that makes you feel relaxed and sleepy.

You want more melatonin when you want to sleep.

And less melatonin when you need to wake up, focus and have more energy

Morning sunlight helps to regulate melatonin so that you have less in the morning while darkness (sunset) releases more melatonin when you need to sleep.

Benefits of increased serotonin in the morning

Morning sunlight triggers the brain to release more serotonin also called 5-hydroxytryptamine (5-HT) and this is the ‘feel good’ hormone.

When serotonin levels are healthy, you’ll feel:

  • Happier and more emotionally balanced
  • Calm yet focused
  • More mentally clear

Serotonin also supports digestion, bone health, sleep, libido, and memory

Winter Sunrise challenge makeselfcaresimple
Align & uplift Sunrise Challenge

I find it amazing that something as simple as morning light can gently signal all of these responses — like a quiet reminder from nature that it’s time to wake up, move, and feel alive again.


Getting Ready for your 28-day Sunrise Challenge

A few quick questions to set yourself up for success:

  1. What time is sunrise this week?
  2. What time do you need to wake up for 5–15 minutes of sunlight?
  3. What’s the weather forecast — and what will you wear?
  4. Can you create a “sunrise spot” in your garden or near a window?
  5. You might like to jot down how this feels as you go.

How to do the Challenge

Spend 5–15 minutes outside within 1 hour of waking and within 2–3 hours of sunrise for 28 consecutive days.

You can wear contact lenses or regular glasses — just avoid sunglasses that block sunlight.

Because this involves early-morning light, it’s not considered a skin risk.
Never look directly at the sun.

That’s it — simple and powerful.


9 Ideas for completing the 28-day Sunrise challenge

Sunrise Challenge - transform your mood in 28 days
  • Have your breakfast outside
  • Outdoor tea or coffee break
  • Exercise outside
  • Go for a walk
  • Garden or water your plants
  • Practice Yoga, Tai Chi or breathing exercises
  • Read, Journal or work outside
  • Spend time with your pets or nature
  • Try an eyes-open mindfulness practice.

Artificial Sunlight

Sometimes natural sunlight just isn’t possible — early starts, winter mornings, or mobility issues can make it tricky.

That’s when artificial sunlight can help.

  • Sun lamps (10,000 Lux or higher) mimic natural light and support your circadian rhythm.
  • They’re often used for SAD, sleep issues, or energy regulation.
  • Always follow manufacturer instructions and check with your optician if you’ll use one regularly.

Tip: Sit near your lamp soon after waking, ideally during your usual sunrise time.

You could also try a sunrise alarm clock, which gradually brightens your room and often includes nature sounds like birdsong — perfect if you:

  • Struggle to wake up
  • Have sleep difficulties
  • Have limited morning time

If budgeting, choose simpler models with quality light over extra features.


Conclusion — One Sunrise at a Time

Are you ready to begin your 28-Day Sunrise Challenge?
Even five minutes of morning light can make a difference — to your mood, focus, and how gently your day begins.

You don’t need perfection (or even an early alarm) — just curiosity, and maybe a cosy jumper.
Step outside, open the window, or simply turn your face toward the morning light. Notice how it feels.

After the challenge, take a moment to reflect on what’s changed.
Has your sleep shifted? Your energy? Your mood?
Then simply notice whether this little ritual feels like something you’d like to keep in your life.

Each sunrise is a reminder that your energy resets, too.
Your wellbeing matters — and I’m here to help you make caring for it beautifully simple 💛

Well done image in Make Self Care Simple brand colours – completion of 28-day self-care challenge
Well-done! You have completed another step towards making selfcare simple

Want to make these ideas work for your body?

Self-care practices and routines are only the beginning. Learning how your body responds when you follow them helps you decide when to keep going, when to adjust, and when to move on.

Explore the free Make Self-Care Simple resources to begin understanding your own patterns.

→ Start with the Free Resources

Make Self Care Simple shares general self-care education for inspiration only. I’m not providing medical advice — always check what’s right for you with a qualified health professional.

©2025 Make Self Care Simple.


Save or Print a summary of this 28-day Sunrise Challenge to keep and refer to by clicking on the ‘Challenge Recipe’ below.

28-day Sunrise Challenge

Prep Time1 day
Active Time28 days

Equipment

  • 1 alarm clock
  • 1 warm clothes
  • 1 Journal/mood tracker

Materials

  • 1 Sunlight
  • 1 Sun lamp (Optional)
  • 1 Sunrise Alarm (Optional)

Instructions

  • The challenge is to spend 5 – 15 minutes outside within 1 hour of waking up and 2-3 hours of Sun Rise for 28 consecutive days.
  • Record your mood daily

Notes

28-day Sunrise Challenge

This challenges enhances your natural circadian cycle helping you balance your serotonin, melatonin and cortisol levels which improves your mood.
Try to look in the general direction of the sun, so that your eyes absorb the light.
You can wear contact lenses and normal glasses but avoid sun glasses that block sunlight reaching your eyes.
Never look directly into the sun.
Record your general mood before you start this challenge.
Track your mood daily.
At the end of the challenge assess your feedback decide if this self care has helped your wellbeing.
Download your FREE Self-Care Challenge Toolkit

A gentle practice to lift your mood and bring you back to the present when the day feels flat.

When to Use It

You wake up and know you’re almost in a funk.
This isn’t a day to sparkle — but it’s not quite an “I hate Mondays” either.
It’s more of an “Is it only Wednesday?” kind of mood.

You can feel the slide into meh coming on, and if you do nothing, the day will probably keep drifting that way.

But this isn’t a day for journaling, goals, or trying to summon positivity.
It’s a day to come back to your senses — literally — and find one small thing that feels okay.

That’s where a Simple Glimmer comes in.


What Is a Simple Glimmer?

A Simple Glimmer is a tiny, sensory moment that offers comfort or reassurance — that quiet “oh, this feels not so bad” feeling.

It’s not about chasing joy or pretending everything’s fine.

It’s about finding something that reminds you what pleasant feels like and that those sensations still exist in your day.

Each Glimmer softens resistance and brings a small shift from heaviness to ease — the kind of shift that helps you take the next gentle step forward.


How to Do It

1. Notice the “meh.”

Catch the feeling early. Don’t judge it — just name it:

“Okay, this is a low-sparkle kind of morning.”

That small moment of honesty is the first step out of autopilot.


2. Come back to your senses.

Turn your attention outward and look for one Glimmer — something your body quietly enjoys.

See: light through the window, your favourite colour, or something in nature.
Smell: coffee brewing, fresh air, a candle, or your hand cream.
Hear: music, birds, or the hush of a calm room.
Touch: warmth, softness, texture, or the feel of your mug in your hands.
Taste: a sip, a bite, or a simple flavour that feels satisfying.

You don’t have to find all five — but noticing a few helps lift the weight of that meh feeling.
As you do, the heaviness begins to soften, and your body remembers what comfort feels like.
That gentle shift — from dullness to a small sense of ease — is where the reset begins.

Reset a Meh Mood

3. Anchor it.

When something feels even a little bit good, pause for a breath or two.
Say quietly to yourself:

“That felt good.”

Notice your shoulders or breath soften — that’s your Glimmer landing.

This is the turning point.
In this small pause, you’ve changed the direction of your day.
Instead of collecting proof that it’s a bad or meh day, your mind starts scanning for what feels steady or comforting.

Each Glimmer you notice strengthens that new pattern — and your day begins to follow a gentler track.
More importantly, you’re learning to guide which track your day follows — one small Glimmer at a time.


Repeat as Needed

Use a Simple Glimmer any time your mood dips or your energy feels resistant.
Each time you do, you remind your body that comfort and steadiness are still available — and that you can find them.


The Simple Glimmer Practice Challenge

This week’s Align & Uplift Challenge is to practice your Simple Glimmer Reset before you need it.
Try it once while you feel okay — just to explore the sensations.

You’ll notice a subtle shift: perhaps a small lift, a sigh, or a feeling of ease in your body.
That’s your nervous system learning what a Glimmer feels like — so when a meh morning arrives, the Reset will feel familiar and easier to use.

Your Mini Test:
Before: Pause for a moment and notice how your body feels right now (without changing anything).
After: Try one Simple Glimmer and notice what’s different — even slightly.
Maybe your shoulders drop, your breathing slows, or your mood feels just a shade lighter.
That’s the Reset in action.

You’ve just trained your body in a new response to “meh.”


Closing Thought

You don’t have to fix the whole day.
Just find one Simple Glimmer — a small, real moment that feels okay — and let it remind you that a lighter, steadier day is still within reach.

Don’t Forget!

The aim of this challenge is to decide if you will add the Simple Glimmer Reset to your personal Menu of Selfcare?

Well done image in Make Self Care Simple brand colours – completion of 28-day self-care challenge
Well-done! You have completed another step towards making selfcare simple

Want to make these ideas work for your body?

Self-care practices and routines are only the beginning. Learning how your body responds when you follow them helps you decide when to keep going, when to adjust, and when to move on.

Explore the free Make Self-Care Simple resources to begin understanding your own patterns.

→ Start with the Free Resources

Most self-care is about treating yourself.

Real self-care is about listening to yourself.

Because being healthy isn’t always easy — but it can be made simple.

Discover 20 healthy salad dressing recipes that fit every diet. From creamy to zesty, these easy, homemade dressings are perfect for the Monthly Nourish Challenge and can be adapted to your unique health needs.

Welcome to this month’s Nourish Challenge inspiration – This month, we’re diving into one of the simplest but most transformative kitchen experiments — discovering the perfect salad dressing to suit your diet.
(And yes, you can start this at any time of year — salads aren’t just for summer!)

Now, I don’t know about you, but I’ve spent years trying to adapt recipes to fit my ever-changing food needs — with varying levels of success.
Some worked beautifully… others, let’s just say, ended up as “learning experiences.

While shop-bought dressings are convenient, they often include ingredients we’re trying to avoid, added sugars, refined oils, artificial flavours, or preservatives. So this month, let’s explore how simple and satisfying it can be to make your own.

How This Month’s Inspiration Fits the Nourish Challenge

The Monthly Nourish Challenge is all about trying one new healthy recipe each week, and learning to adapt it to your unique health needs.

Each month, I’ll share a theme for inspiration, like this collection of homemade salad dressings, to help spark your creativity in the kitchen.
You can:

  • Choose a recipe that already fits your dietary needs, or
  • Get creative! Combine the flavour ideas from one recipe with ingredients that suit your diet from another.

You can also pick any healthy recipe that inspires you this week, the aim is simply to experiment, adapt, and discover what nourishes you.


Why Salad Dressings?

Homemade dressings are one of the easiest ways to make healthy eating more enjoyable. They bring life to salads, roasted veggies, grain bowls, and wraps, and they’re a wonderful way to include more nourishing oils, herbs, and spices in your diet.

I personally found that salad dressings can transform boring repetitive salads – and often add a boost of extra nutrition!

The goal is to find combinations that make you look forward to eating more fresh veggies, while discovering what works best for your body.


Before You Save These Recipes for “Later”…

Here’s a Tiny Step That Helps You Actually Use Them

Most of us collect healthy recipes with good intentions — and then real life takes over.
If you’d love a simple way to turn inspiration into something your body actually gets to enjoy, start with the Free Self-Care Start-Up Toolkit.

👉 Download the Toolkit (free)

Featured Recipes from Food Bloggers

I’ve put together a collection of inspiring recipes for salad dressings from talented food bloggers to help you get started.

Carrot Ginger Dressing

From loveandlemons.com easy ingredients, sweet and tangy

Ingredients include roasted carrots, ginger, rice vinegar and olive oil

Chickpea Flour Mayonnaise

From powerhungry.com a vegan (egg-free), nut-free and soy-free mayonnaise

Ingredients include chickpea flour, lemon juice, neutral oil, and dijon mustard

Almond Butter Sesame Dressing

From paleorunningmomma.com this dressing is included in her Paleo Chinese Chicken Salad.

Ingredients include medjool dates, coconut aminos, sesame oil and rice vinegar

How to Make the Most of This Month’s Theme

  • Meal-prep tip: Whisk up a batch on Sunday to keep your salads exciting all week.
  • Storage idea: Store in a glass jar and shake before serving — most dressings keep for 4–5 days.
  • Self-care moment: Take a mindful pause while preparing your dressing; notice the colours, scents, and textures.
  • Set an Intention as you make your dressing to Nourish your body and health Levels.
  • Give a moment of appreciation for the nourishing ingredients

17 Creative Salad Dressing recipes for Every Diet

Vegan – Dairy-free, Egg-free Dressings

Creamy Vegan Cucumber Dressing

From foodforthesoul.com vegan, raw food, dairy-free, egg-free

Ingredients include cucumbers, garlic, lemon juice, olive oil

Homemade Egg-free Mayonnaise

From mommyshomecooking.com vegan, egg-free, nut-free, dairy-free

Ingredients include aquafaba (chickpea water), oil and lemon juice

Vegan Sour Cream

From mypureplants.com is vegan, egg-free, nut-free, dairy-free

Ingredients include sunflower seeds, lemon juice and apple cider vinegar

Mediterranean Dressings

Mediterranean Salad Dressing

From thespanishradish.com super easy to make

Ingredients include extra virgin olive oil and red wine vinegar and herbs

Ladolemono: Greek Salad Dressing

From themediterraneandish.com a truly multi-purpose lemon vinaigrette

Ingredients include extra virgin olive oil and lemon juice

Greek Yoghurt Salad Dressing 

From foolproofliving.com a good source of protein

Ingredients include Greek Yoghurt, extra virgin olive oil, lemon juice

Dressings for Special Diets

Ginger Lime Tahini Dressing

 By  lowhistamineeats.com and is low histamine and fodmap

Ingredients include tahini, coconut aminos, maple syrup

Creamy Garlic Dressing

By nourishinghope.com is Dairy-Free, Nut-Free, Egg-Free, Low oxalate, Paleo, SCD/GAPS

Ingredients include Pumpkin seeds, Sunflower butter, lemon juice.

Low fodmap Italian Dressing

 By alittlebityummy.com low-fodmap, dairy-free, gluten-free, nut-free, soy-free egg-free

Ingredients include Garlic infused oil, Red wine vinegar, Herbs

Low Fodmap Poppy Seed Dressing

By fodmapeveryday.com low-fodmap, dairy-free,

Ingredients include poppy seeds, minced scallions, Dijon mustard

Alkaline Salad Dressing 

By mealraculous.com no-oil, alkaline, low-fat

Ingredients include avocado, parsley, basil pesto

Creative Healthy Dressings

Creamy Herby Hemp Dressing

 By  feastingathome.com is both vegan and keto, it is nut-free and soy-free

Ingredients include Hemp seeds, nutritional yeast, herbs

Orange Miso Ginger Dressing

By EatPlant-Based.com vegan and oil-free

Ingredients include orange juice, rice vinegar, white miso

Pumpkin Seed Cilantro Dressing 

By eatwellenjoylife.com good for nervous system and adrenals

Ingredients include pumpkin seeds, cumin, lemon juice,

Superfood Vinaigrette

 By tasteloveandnourish.com turn an ordinary salad dressing into a superfood party!

Ingredients include apple cider vinegar, chia seeds, Maple syrup

5-minute Creamy Raspberry Dressing

 By shahzadidevje.com – vinegar free! Vegan and diabetes-friendly

Ingredients include Raspberries, lemon juice and olive oil

Creamy Almond Curry Sunshine Dressing

By hummusapien.com to make your veggies pop!

Ingredients include almonds, apple cider vinegar, maple syrup and warming spices

✨ Ready to start?

Pick one new healthy recipe to try this week — and discover how a simple recipe can make healthy eating truly delicious.

Well done image in Make Self Care Simple brand colours – completion of 28-day self-care challenge
Well-done! You have completed another step towards making selfcare simple

Want to make these ideas work for your body?

Self-care practices and routines are only the beginning. Learning how your body responds when you follow them helps you decide when to keep going, when to adjust, and when to move on.

Explore the free Make Self-Care Simple resources to begin understanding your own patterns.

→ Start with the Free Resources

Make Self Care Simple shares general self-care education for inspiration only. I’m not providing medical advice — always check what’s right for you with a qualified health professional.

©2025 Make Self Care Simple.

Learn how dry brushing can support lymphatic health, reduce bloat, and refine skin texture in this simple 28-day routine for beginners. Your glow starts here.

The Skin You Forgot You Had

As the weather warms and the winter layers come off, there’s always that moment — you catch a glimpse of your arms or legs and realise you haven’t really seen them in months.

It’s not about vanity; it’s about rediscovery.
For most of us, the skin on our face gets all the attention, while the rest quietly hides under jumpers and jeans, waiting its turn.

That’s why this month’s challenge is all about remembering the rest of you — your arms, legs, shoulders, and back — all the skin that’s been patiently waiting for a little care.

For me, this started as a spring ritual — part reset, part reunion — a way to literally brush off winter and wake my body up again.
(And yes, dry skin brushing really does make you glow — even before the holiday tan.)

This simple 28-day practice takes just a few minutes a day, yet it leaves you feeling more alive, energised, and at home in your own skin.

Jump to Recipe

The very first question to ask is…

Will this Dry Skin Brushing challenge support my well-being?

Is Dry Skin Brushing something that could support your wellbeing needs?

Here are some signs that dry skin brushing could benefit you. 

** Dry skin brushing is not performed on the face

  • Your skin looks dull – has lost its glow
  • Your skin is dry and flaky
  • Skin is more oily
  • Poor skin texture (feel & appearance i.e. skin bumps) and tone (colour)
  • Visible pores and clogged pores
  • Ingrowing hair
  • Skin breakouts
  • Fatigue and tiredness
  • Bloating, puffiness & water retention
  • Frequent headaches
  • Recurring infections such as UTI or colds
  • Constipation

**These are good areas (symptoms) to assess and score before you start the challenge

When to avoid skin brushing

Speak to a health professional first if you are currently undergoing immune-system  treatments, have ongoing skin infections, psoriasis, eczema, open wounds, burns,skin growths or take topical steroid creams.

What is Dry Skin Brushing?

Full disclosure: There are no scientific studies to back this self care practice.

Claims about reducing cellulite have not been proven…

Now that is out of the way – what do we know about dry skin brushing?

Dry Skin Brushing has been practiced for thousands of years – all around the world

  • In Ayurvedic medicine it is called Garshana and traditionally uses a rawsilk or linen sock.
  • In Japan it is called Kanpumasatsu and uses a dry towel
  • In Chinese Medicine it uses dried fruit fibres such as a Loofah
  • The Greek & Romans used copper Strigils
  • In Native American medicine it used corn cobs
  • In Polynesian cultures they used crushed seashells 
  • And the Turks and Russians used the popular body brushing method.

Dry Skin Brushing is performed before a shower when the skin is dry. Use a dry towel, brush or loofah and brush over your skin causing a pleasant friction. You only need to do this for a couple of minutes and use a firm but not hard pressure. Then follow with your regular shower routine.

The general rule is to brush towards your heart.

** If your goal is to reduce lymph congestion (Puffy skin) see links below.

Because Dry Skin Brushing can be stimulating it is recommended to do it earlier in the day. Especially if you have sleep issues.

Honestly it is very simple to do (full instructions below) and feels great.

How Does Dry Skin Brushing Work?

When you brush your dry skin, you loosen dead skin cells, so that they can be washed off and reveal new, smooth and brighter skin cells. 

Dry skin brushing is a form of exfoliation speeding up the process of shedding old skin cells. It is thought that regular exfoliation improves skin texture and tone i.e. pink bumpy skin and enhances body lotion/product absorption.

Another aspect of detoxification is your Lymphatic system. This is like a slow moving canal carrying waste out of the body – that relies on body movement to squeeze it along the body . Old time healers believed dry skin brushing encouraged movement of the Lymph. 

Dry Skin brushing can be helpful as a regular practice if you are unable to be active most of the day. This might result in relief of puffiness and water retention much like massage.

Dry Skin Brushing also activates nerve endings in the skin which is what creates that pleasant tingling and invigorating sensation.

Preparing for your Challenge

Luckily this self care practice is simple to prepare.

You can use any of the following;

  • An existing body towel (not too soft!) long enough to do your back
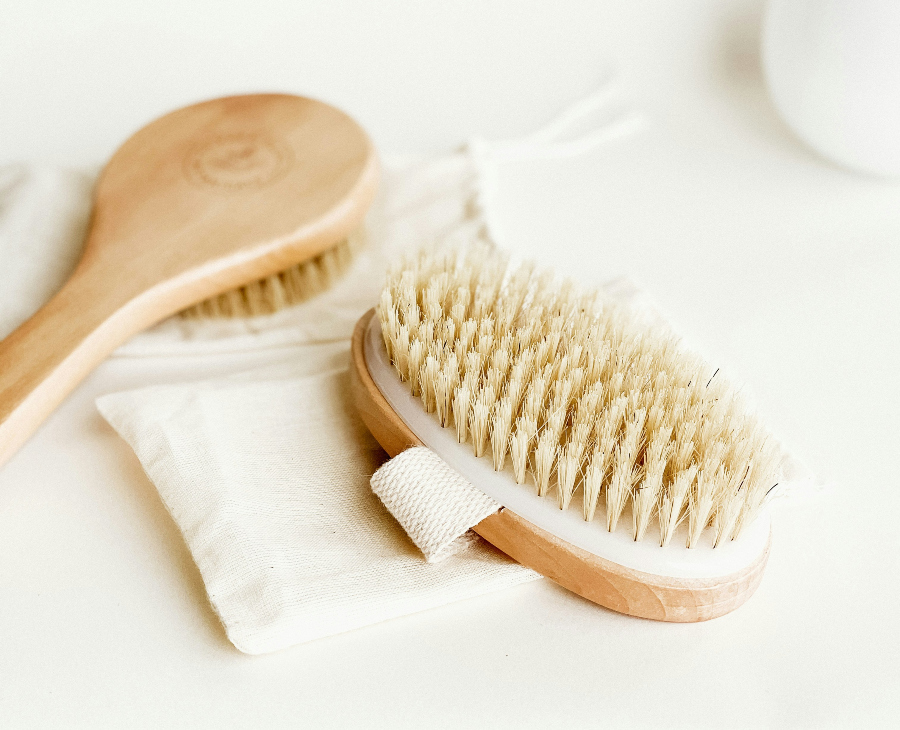
  • A Dry Skin Brush with natural bristles (detachable handles are handy!)
  • A Loofah

Optionally you can dive deeper in which type of Dry Skin Brush to use HERE

dry skin brushes

You will also need to capture details about your before and after assessments and tracking sheets to help you stay consistent.

How to do the Challenge

For the challenge you only have to do the basic routine at least 3 times a week for 4 weeks (28 days). * You can choose to skin brush every day

Assess and score your overall well-being – especially those areas mentioned at the start of this article – before you begin and again when you complete the dry skin brushing challenge. 

Remember you can use either a dry towel, special dry skin brush or loofah

Basic Routine

  • Start from your feet and brush upwards in long sweeps along the front, back and sides of your legs. Include your buttocks. Medium pressure.
  • Then go from your hands to your shoulder in the same manner. Don’t forget the back of your neck!
  • Use a circular (anticlockwise to mimic the colon and aid the process) movement across your abdomen and then for your armpits.
  • When it comes to your back, I always go upwards in short strokes from the base of my back and downward strokes from my shoulders. Don’t forget your sides under your arms which I do in short strokes.
  • I go very gently if at all, over my chest area and avoid my face

It should take less than 5-minutes.

I have never followed a set number of times to brush each area or complete the routine – my routine is more intuitive. 

Once is fine but if you intuitively feel that you want to do more – do! Remember the benefit comes from repeating the routine 3 times a week for 4 weeks.

Start with a mild pressure – this should not make the skin red and irritated.

Notice how you feel when you have completed your dry skin brush. It should feel good!

Then have your shower as normal.

Tweak the Dry Skin Brushing Challenge to Your Needs

Following the basic routine 3 times a week is enough to see results.

You can also choose to dry skin brush every day. I would not do it more than once a day.

You can also tweak the routine to your needs. If dry skin brushing makes your skin very irritated try a softer pressure or material.

There are detailed routines that work more closely with your lymphatic system which a naturopath might advise to support specific health conditions.

 And of course you can leave out certain areas of your body if you need to.

Advanced Skin Brushing

What if you want to focus mainly on your lymphatic system with dry skin brushing?

I like to combine dry skin brushing with a manual lymphatic drainage routine to open up my lymph nodes first ** Simple challenge coming soon.

You might find it interesting to check out this dry skin brushing technique for lymph movement HERE

Drinking enough water and daily movement will work really well with dry skin brushing.

Assessing your Dry Skin Brushing Challenge Results

At the end of the 28-days you complete another assessment.

What differences did you notice? Write them down. 

I just like how good dry skin brushing feels and how soft my skin feels afterwards and I also know I am helping my body detox better.

How about you? Is this self care practice something you will include in your regular self care menu?

Conclusion

Congratulations on completing your 5 Minutes to Feel Good in Your Skin: A 28-Day Dry Brushing Challenge!

I hope you’ve found this practice helpful, energising, and maybe even a little bit joyful.
After all, it’s not just about smoother skin — it’s about remembering the rest of you that’s been hiding under those winter layers.

And remember, one month is only the beginning.
Self-care — like glowing skin — builds with consistency. So keep brushing, keep noticing, and keep showing up for your body in these small, simple ways.

Because feeling good in your skin isn’t a quick fix — it’s a relationship that gets better the more time you spend together.

Well done image in Make Self Care Simple brand colours – completion of 28-day self-care challenge
Well-done! You have completed another step towards making selfcare simple

Want to make these ideas work for your body?

Self-care practices and routines are only the beginning. Learning how your body responds when you follow them helps you decide when to keep going, when to adjust, and when to move on.

Explore the free Make Self-Care Simple resources to begin understanding your own patterns.

→ Start with the Free Resources


Make Self Care Simple shares general self-care education for inspiration only. I’m not providing medical advice — always check what’s right for you with a qualified health professional.

©2025 Make Self Care Simple.

Print or save a summary of this challenge in the handy Challenge ‘Recipe’.

5 Minutes to Feel Good in Your Skin

28-day Dry Skin brushing Challenge

Equipment

  • 1 Towel
  • 1 Dry skin brush Optional
  • 1 Loofah Optional

Notes

How to do the Dry Skin Brushing Challenge

For the challenge you only have to do the basic dry skin brushing routine at least 3 times a week for 4 weeks (28 days).
Assess and score your overall well-being – especially those areas mentioned at the start of this article – before you begin and again when you complete the dry skin brushing challenge. 
You can use a dry towel, dry skin brush or loofah.
Basic Dry Skin Brushing Routine
  1. Start from your feet and brush upwards in long sweeps along the front, back and sides of your legs. Include your buttocks. Medium pressure.
  2. Then go from your hands to your shoulder in the same manner. Don’t forget the back of your neck!
  3. Use a circular (anticlockwise to mimic the colon and aid the process) movement across your abdomen and then for your armpits.
  4. When it comes to your back, I always go upwards in short strokes from the base of my back and downward strokes from my shoulders. Don’t forget your sides under your arms which I do in short strokes.
  5. I go very gently if at all, over my chest area and avoid my face 
 
Assess and score at the end of 28 days.
How did you get on?